Sunday, November 1, 2015

Where's Lyndsey Camille?!


Where. Have. I. Been? I have (unfortunately) not posted on Dear Beautiful... for almost 5 entire months! I truly apologize :(. However, my reasons as to my absence are still pretty great. Throughout the last 5 months my life has been going through a whirlwind of changes: graduating high school, starting college, balancing my academics, being away from home, etc.  All that crazy stuff! It's been hard to simply balance academics, social life, my sanity, and maintain my blog. However, my goal is to revive my blog. Blogging was, and is, my form of therapy. I love to write, especially about the topics that I love. So, be on the lookout for more posts from soon ranging on topics about fashion and beauty to the college lifestyle! 

Drop your blog links below :) 

Tuesday, July 7, 2015

Beauty 101: What's Up With O.P.I. Infinite Shine?

 Recently, I (thankfully!) found a replacement for gel nails. Gel nails were nice and long withstanding, however, made my natural nails thinner and took up a lot of space and time. The latest replacement is O.P.I.'s Infinite Shine! Infinite Shine is a three-bottle process and doesn't need any lights or excess nail prep. The purpose of Infinite Shine is to create a shiny, lustrous polish that lasts up to 10 days! And, although it does not advertise to be chip free for 2 weeks, the shine and polish does last for at least 7 days.

Now, the process consists of about 3-4 steps. It begins with applying the Infinite Shine 1 Primer, practically the equivalent of a clear base coat. Then, of course, the Infinite Shine 2 Nail Lacquer in any color choice. I purchased a bright pink for the summer and a nude polish for a simple and clean manicure. The Infinite Shine 2 Nail Lacquer does require a good amount of shaking before use as well as about 2 coats of color. After applying step 2, the process finishes out with Infinite Shine 3 Gloss which is similar to top coat. After these three steps, let the nails dry and settle. 


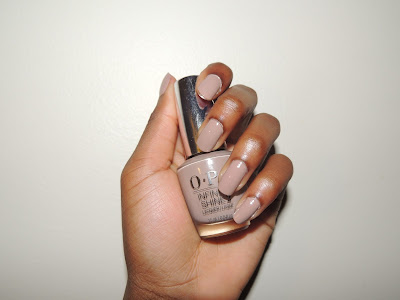
Above are pictures of my Infinite Shine manicure in nude. The nail polish is extremely true to color after being applied to my nails, even after just one coat! My only "big" tips for the Infinite Shine process is to make sure the polishes are properly shaken before applying. If not, the manicure could turn into a clumpy, streaky, mess. However, unlike gel nails, Infinite Shine does not seem to thin or discolor the nails, takes a lot less time, and comes off with acetone-based nail polish remover, like any other nail polish! It's a complete manicure win in my beauty book!

Have you tried O.P.I.'s Infinite Shine Nail Lacquer? Why or Why Not? 

Wednesday, April 1, 2015

Fashion 101: Every Girl's Bra Dilemma

Every Girl's Bra Dilemma

Every Girl's Bra Dilemma by lyndseycamille 
Shopping is probably at the top my list of favorite things to do on the weekend; however, bringing it home and styling can be a different story sometimes. For instance, spring is here and summer is coming, meaning shoulders will be out in an array of styles and cuts. So, what type of bra should we wear under these crazy cut tops? Well, I have a couple of bra style tips, just keep reading below:
  • Bralette (top left): Bralettes are the perfect bra to place underneath sheer tops, kimonos, and whenever you want to add a touch of lace to an outfit. Typically bras should not be shown underneath clothing, however a bralette resembles an even shorter version of a crop top while still supporting the girls!
  • Bandeau (bottom left): Similar to bralettes, bandeaus are perfect for keeping your "goods" covered without having to layer up with t-shirts and camisoles. Bandeaus are super cheap and can be found anywhere from department stores to Wal-Mart!
  • Strapless Bra (top right): Every girl should own at least one strap less bra! Strapless bras are perfect for just about any top: spaghetti straps, halter back etc. Strapless bras also come in varieties of their own such as plunging v-neck or addable straps!
  • T-Shirt Bra (bottom right): The t-shirt bra is essentially an everyday bra! Be sure to try the t-shirt style bra on in the store, and even get fitted if need be! A t-shirt bra should be comfortable and, particularly, in a color that can easily mix and match with an everyday wardrobe. 
  • Razor-Back Bra (middle): With the warmer temps, tanks and camisoles are becoming an everyday essential! A razor-back bra will help to give you the needed support and won't necessarily play peek-a-boo with your top.
  • Adhesive Bra (bottom middle: Now for those special events that having an "oops" moment with a bra could be mortifying, an adhesive bra is perfect. Many times strapless dress and formal gowns with cut-outs or more revealing shapes still need a bra. However, it's always extremely hard to find the perfect bra style to pair it with! Adhesive bras can be found in almost any skin tone and bra size. Just adhere the sticky side of the bra to the breast and instantly have the feel and look of wearing a bra!
Add your bra tips in the comments below!

Friday, March 20, 2015

Beauty 101: My Everyday Make-Up Routine


Long time, no blog! I truly apologize for the blogging delay, senior year is crazier than ever! However, with all the craze of academia, my make-up routine has come a long way. Instead of spending time scouring the shelves for red and pink lipsticks, I love finding great mascaras, light-weight foundations, and fierce eyeliners. So, for my new daily makeup routine, I incorporate just those tools. Keep reading below to find out the steps to my make-up routine:
  1. Clean, moisturized face! I always start my make-up routine with a cleansed face. I typically cleanse my skin with cold water or dabs of Neutrogena Rapid Clear toner. This helps to maintain my skins natural health. I also follow up with a moisturize to give my skin an extra glow! 
  2. Clinique Powder Foundation/Maybelline BB Cream! Foundation ultimately helps me to cover up my dark spots and make my skin appear more even. The BB cream also helps to fade my dark spots which is a double plus!
  3. The brows! For my eyebrows, I use Benefit Gimme Brow. This product looks like a mascara brush, but is used for your brows! It helps to define the shape and fill in any gaps or sparse areas. Plus, if too much products gets in the brows, simply use an eyebrow brush to wipe the excess away. 
  4. Neutral shades! Neutral eyeshadow shades always make brown eyes pop! My favorite shades are dark browns for the crease, soft golds, and lighter browns for the brow bone.
  5. Finish the eye! In order to finish off my eyes, I love to do a slight cat eye with pencil liner in either black or brown. I then finish it off with mascara, usually brands such as Clinique and Benefit. 
  6. Luscious lips! Now, I am not one for lots of lip color, but I do like my lips to feel and look soft and smooth. So, I always use a lipbalm to keep them as just that! 


Tell me about your make-up routine below!

Sunday, January 11, 2015

Skincare Secrets: Adding Zinc to Skin Care

So I've always been prone to breakouts, especially during "that" time of the month. These breakouts would involve bumps everywhere, some that were even painful! Now, I've tried many products, some help me make substantial strides to clearer skin, especially zinc vitamins. For the past month and a half, I have been consistently taking a zinc vitamin alongside my breakfast. Zine is most helpful with immune health, but also acne and boils. By taking Zinc, I have escaped the winter colds and flu spread throughout my house. And, for my benefit, less breakouts and painful bumps. Of course, taking a regular multivitamin can also do the trick, along with drinking at least 3 glass of water per day, washing the face daily, and getting 8 hours of sleep. 

What is your latest skincare secret?

Sunday, December 28, 2014

Shopping 1101: Don't Blow the Budget

We all want a closet like Carrie Bradshaw, but even Carrie wouldn't completely blow her budget. During the holiday season, it gets hard to maintain a budget with the stacks of accumulating stacks of coupons, receipts, and discount emails that seem to be never ending. And, if you're in the same situation as me, you might just be trying to bounce off from low funds due to the holidays. Follow the tips below to save up your cash!
  • Never go shopping without a list! A lack of purpose leaves rooms for unnecessary items in your cart. 
  • Always set a budget, or spending limit, before going out to shop. Setting shopping guidelines helps you to be more wallet-conscious while shopping. 
  • Utilize shopping apps! Apps like Retail Me Not and Shop Savvy help you to find the best deals and coupons, plus they're free!
  • Never be afraid to ask about coupons and discounts. Many stores have student discounts, military discounts, and senior citizen discounts. Some store clerks are even willingly to give you a store coupon.
Drop some of your cash-saving shopping tips down below!

Sunday, December 14, 2014

Winter Woes: Dry Lips Be Gone

Dry Lips Be Gone

Dry Lips Be Gone by lyndseycamille
If your winter is anything like mine, dry lips are always involved. No matter how much chapstick I slather on my lips, the dry air still causes them to chap. However, with the weekly lip treatment I created above, I can easily nix my dry winter lips. Keep on reading to find out the three steps in my weekly dry lips routine.
  1. The toothbrush! Take an old tooth brush, or a new inexpensive toothbrush, to use as a lip exfoliator. Make sure to wet the toothbrush as well as your lips. Then, gently and slowly rub the toothbrush around your lips to remove the dead skin. Do so until your lips feel smooth (lips should not feel raw or red, or else your rubbing to hard/long!)
  2. A lip scrub! A lip scrub exfoliates the lips similar to the toothbrush. Apply the lip scrub using either your fingers or the tooth brush, following the same directions as step 1. Also, if you don't want to invest in a lip scrub, make your own using a mixture of sugar and water. 
  3. Lip balm! Always follow this lip treatment by applying a lip balm. Try using a lip balm specifically for dry lips such as EOS or Vaseline. Be sure to apply a lip balm at least once a day to protect your lips throughout the week.
How do you fight dry, winter skin and lips?