Showing posts with label tutorial. Show all posts

Monday, January 20, 2014

Beauty 101: It-Girl Lupita Nyong'o

Lupita Nyong'o
Award season is in full swing and Lupita Nyong'o has proven to be the red carpet It-Girl! Lupita is truly a beauty! From her glowing skin, toned muscles, gorgeous make-up, edgy hairstyle, and, of course, her amazing outfit choices, she always gets it right! Lupita always goes for a defined brow and a pop of lip color in all her beauty looks as seen above. However, what I love in her beauty look above is the flirty lashes and eye shimmer she adds to the look. This beauty look can easily be dressed up or dressed down with the slight strokes of a make-up brush. All you need to recreate the look is shimmery (cream) eyeshadow, liquid eyeliner, mascara (falsies), a brown lipgloss and lipstick, and an eyebrow pencil. 
  1. Begin with a clean face and apply foundation as needed.
  2. Add soft flush of blush to the apples of the cheek to the temple.
  3. Fill in eyebrows with soft, short strokes that resemble hairs. Be sure to brush through the brows to blend in the marks.
  4. Apply the shimmery eyeshadow, preferably cream shadow, to lower eyelids. 
  5. Line the lower lash line with eyeliner. Then line to the upper lash line with a slight cat eye.
  6. Apply 2-3 coats of mascara. Add false lashes if desired.
  7. Apply lipgloss and lipstck to finish the look.

Do you keep up with award season? 

Sunday, December 15, 2013

Get the Look: Beyonce's ***Flawless Video

Beyonce
Being the Beyonce super-fan I am, I purchased the latest Beyonce album. It is a must have if I do say so myself. After listening to every song and watching every video, I have come to the conclusion that "***Flawless" is my new favorite song. My favorite look from the "***Flawless" video is in the photograph above". I am in love with sultry, edgy make-up and bedhead hair. The look is easily attainable with the use of red lipstick, black eyeliner and mascara, and a curling iron.
  1. Begin with a clean face. Apply foundation and concealer as needed. 
  2. Apply eyeliner to the lower lash line. Allow the line to become thicker as it nears the outer corner of the eye.
  3. Apply eyeliner to the top lash line into a winged effect. Be sure to slightly smudge the liner for an edgier look. 
  4. Apply 2-3 coats of mascara to the top and bottom lashes.
  5. Apply lipstick to lips. 
  6. Clean up any mistakes with a q-tip and make-up remover.
  7. Finish the look by wrapping sections of hair around a curling iron for 10-15 seconds. Then finger-comb the curls. Braiding the hair overnight will also give the same effect.
Have you listened to Beyonce's new album? List your favorite songs below!


Wednesday, November 20, 2013

Beauty 101: Selena Gomez Teen Vogue Cover


I am obsessed with Selena's latest Teen Vogue! The entire beauty look is absolutely gorgeous, natural, and beautiful. The tousled hair, bold brows, natural lip color, and mascara'ed eyes are perfect for a quick and easy look. All you need to recreate the look is foundation, a brow pencil, mascara and liner, and earth tone eyeshadows. Follow the steps below to create a quick and natural look inspired by Selena's latest cover:
  1. Use a foundation and concealer to create a smooth, even skintone.
  2. Using light, short strokes, fill in eyebrows and create a more defined brow look.
  3. Apply a highlighter shadow on the brow bone and a dark shadow in the crease. Be sure to blend!
  4. Lightly line the eyelids with liner, then apply 2-3 coats of mascara.
  5. Apply a lip balm to keep lips moisturized.
What are your steps to a natural make-up look?


Saturday, November 2, 2013

Get the Look: Denim Blues


Lily Collins
Lily Collins lets her make-up resemble her patchwork denim top with the use of eyeshadow and a brush. Lily paired her denim colored shadow with a sweep of pink blush, nude lips along with dark mascara and liner. Follow the steps below to achieve this denim blues beauty look:
  1. Begin with a clean face and apply foundation and concealer.
  2. Use an eyeshadow brush to sweep a dark blue shade on the lower eyelid up to the crease.
  3. Use a brown eyeshadow in the crease and sweep outwards to soften the blue shadow.
  4. Line your lower and upper lashline then apply 2-3 coats of masacara.
  5. Add a pink blush to the cheeks. 
  6. Finish off by applying nude lipstick.

Monday, October 21, 2013

Hair 101: The Deep Side Part

AnnaSophia Robb

AnnaSophia Robb
A deep side part puts a whole new twist on hair! Creating a part starting at the peak of your eyebrow can bring the drama. This hair look can help show off the angles of your face and change up your look without a cut or dye. All you need to try out the look is a rat-tail comb.
  1.  Line up the rat-tail end of the comb to the peak/high point of your eyebrow and bring it straight back until it creates a part in your hair. 
  2. Then comb your hair until the part is noticeable and as deep as you would like.
Now to take AnnaSophia's spin on the hair look, you can either create deep Hollywood waves in your hair or even substitute for casual beach waves. Just grab your curling iron and experiment! You can also go edgier and leave out your bangs and pull the rest of the hair into a sleek bun. 

How do you rock a side part?

Monday, September 23, 2013

Get the Look: Quirky Bun, Natural Make-Up


Zendaya
Zendaya is always adding fun quirks to her everyday style and beauty which makes her looks super fun, young, and very memorable. In the photo above, Zendaya takes a chic slicked backed bun and turns it into a fun swirl, giving an extra va-va-voom! Zendaya keep her make-up light and natural which is perfect for an everyday make-up look and added hoop earring for even more visual interest. To get the look all you need is a brush, bobby pins, and hair tie for the hair and mascara, eyeliner, blush, foundation, and lipgloss for the face.
  1. Start off with your hair by brushing out all the tangles and smoothing down the edges.
  2. Pull the hair up into a high ponytail. Try to make it as sleek and smooth as possible and secure with the hair tie.
  3. Begin twisting the ponytail until it begins to swirl in weird shapes. 
  4. When you have achieved your perfect hair swirl, begin pinning down the hair with bobby pins.
  5. Now make sure your skin is clear and apply foundation as needed.
  6. Now apply blush the the apples of the cheeks. Try smiling as you apply the blush for the most natural looking application.
  7. Apply 2-3 coats of mascara and lightly line the top lash line with eyeliner.
  8. Lastly coat the lips with a lipgloss or lipstick for a flush of color on the lips.
Now you have a fun new hairstyle along with a natural make-up look! However, if you want to amp up the look even more, just add hair accessories to the bun, pop some colored liner on the lower eyelid, or even fill in the brows to stay on trend with bold brow look for fall.

Monday, August 5, 2013

Back 2 School: Messy, Chic, and Totally Cool Hair

Whether you have short or long hair, you always want to have a quick and easy everyday hairstyle which is why I love Miley Cyrus's wavy hair look. All you need to recreate the look is a curling iron and a comb. Take sections of your hair and wrap it around your curling iron, then comb or brush through the curls. Make the curls softer and a bit messier by combing through with your fingers and even adding a bit of texture cream to it. Wah-la, perfect everyday hair for back to school!
Miley Cyrus 
Miley Cyrus 

Sunday, July 21, 2013

Back 2 School: Selena Gomez Inspired Beauty

Selena Gomez

Sometimes it's hard to create an extravagant beauty look for school since you have to wake up at the crack of dawn and be there for hours on end. However there is time to accentuate your features and create a cute hairstyle that will have you turning heads all day long. Selena Gomez always keeps her makeup simple, but pretty which makes her perfect inspiration for a back to school beauty look. All you need to recreate the makeup look is liquid eyeliner, mascara, rosy blush, lipgloss, and a neutral eyeshadow. For the hair, all you need are bobby pins, a brush, and a ponytail holder.

Makeup:
  1. Start off with a clean face and apply foundation, BB Cream, and/or concealer as needed.
  2. Sweep a neutral shadow across your lids up to your crease for a light wash of color.
  3. Apply liquid liner close the lash line ending with a slight wing. Make the line as thick or thin as you would like.
  4. Apply 2-3 coats of mascara on your top and bottom lashes.
  5. Take your blush and apply it to the apples of your cheeks and fade it out to your temples.
  6. Apply lipgloss to your lips.
Hair:
  1. Brush the tangles out of your hair and create a side part.
  2. Brush your hair to one side and divide it into two sections.
  3. Tightly twist the two sections together and secure them with a ponytail holder.
  4. Lightly tug the twist as well as your bang to make the hair looser and more casual.


Tuesday, July 9, 2013

Hair 101: Girly, Messy, Chic!

Rihanna
I love this super girly, yet messy and casual, updo! The curls are flirty and a cute bow accent will make it even more adorable which makes the look perfect for a date or a casual day out. All you need to recreate the look is a curling iron or wand, a hair tie, bobby pins, and a hair scarf. Recreate the look with these easy steps down below:
  1. Begin by curling all your hair into loose ringlets. It does not have the be perfect.
  2. Section off the hair in front so that it will frame your face.
  3. Take the hair left in the back and pull it up into a high ponytail. Make sure the ponytail is not pulled too tight.
  4. Use the bobby pins to help keep your hair in place and put the curls exactly where you want them.
  5. Take a cute hair scarf and wrap it into a bow right in-between the ponytail and bang.
Now you have a cute messy updo that's great for getting the hair off your face for the summer while still being able to look chic. Let me know in the comments below how the style works for you.
How do you keep hair off your face?

Friday, July 5, 2013

Hair 101: Quick and Easy 2 Minute Bun

Sarah  Hyland
Buns are my go to hairstyle, they're easy, cute, and keep my hair out of my face. After putting my hair up into what feels like a hundred buns, I've finally found an easy way to speed up the process. All you need is a brush, hair tie, and bobby pins. Keep on reading below to find out how I create my quick and easy bun.
  1. Brush the tangles out of your hair and begin pulling it up like a ponytail. *You may need to use hairspray if your hair tends to fall.*
  2. Loop the hair tie around your hair once.
  3. Now loop the hair halfway until it is in a half ponytail/half bun style.
  4. Take both sides of the half ponytail/half bun and connect them at the front of your head. Secure with a bobby pin(s).
  5. Wrap extra hair around the bun and secure extra pieces with bobby pins.
  6. Use hairspray and hair accessories as desired.
Remember, you may have to modify certain steps to make it work for your hair type and leave any questions in the comments below. Don't forget to let me know how it turns out!

What is your go to hairstyle?

Thursday, July 4, 2013

Get the Look: Fourth of July Fashion!

Fourth of July Fashion!
Fourth of July is all about being patriotic which means it's time to pull out all your red , white, and blue! Of course it is still hot so it's important to dress for the season and the event you will be attending. You can go super casual with a pair of blue jean shorts paired with a red crop top or American flag tank. If the event is on the formal side, try wearing a blue or red striped dress with a pair of cute flats. If you want to look like a fashionista, try pairing a blazer over a graphic tee with high waisted shorts and sneakers all in red, white, and blue. Don't forget that you can also use accessories such as nail polish, purses, and sunglasses to dress up for the 4th of July.
How do you you show off your patriotic side?

Monday, June 10, 2013

Beauty 101: Summer Days to Summer Nights

Summer is a time for a fresh face with light, but with pops of fun color! Zendaya always leaves her face makeup very natural, but keeps a nice glow through blush, lipstick, and an occasional cat eye. Keep on reading to learn how to transition a fresh faced look from summer days to summer nights. All you need is a BB Cream, a light blush and lipstick color, mascara, eye liner, and a highlight.


  1. Start with a clean face and apply a BB cream evenly all over your face. 
  2. Brush and define your brows if needed then apply a highlight underneath on your brow bone.
  3. Line the upper lash line as well as your water line lightly. Make sure you do not line to heavily or else your eyes will appear raccoon-esque. 
  4. Apply 2-3 coats of mascara. 
  5. Apply a swipe of blush to the apples of your cheek.
  6. Apply the lipstick to you lips. Using a primer beforehand on your lips will help to keep it on all day.
  7. Transition the look to night time by taking your liner out into a thick cat eye.

Saturday, June 1, 2013

Beauty 101: 5 Minute Winged Liner and Mascara

Lauren Conrad 
So lately I have been getting back into my old routine of wearing mascara, winged liner and a highlight on my brow bone. I love the look so much that I don't know why I ever stopped! Lauren Conrad is the best example of the mascara, winged liner, and highlight look because it has become her signature look, however Lauren and I have two totally different techniques. Below is how I get a great winged liner and mascara look in about five minutes.
  1. Begin by applying to your entire eye lid and a little bit after your lashline.
  2. Take an eyeliner pencil and make short strokes close to your lashline. The lines can be however thick you would like do not have to be perfect.
  3. Take the pencil or a liquid liner and connect the short strokes. Slighty flick the pencil or liquid liner upward to create the winged look.
  4. Take your mascara and apply two coats in a zig zag motion. Don't be two rough!
  5. Continue with the mascara and brush across the top of your lashes.
  6. Repeat steps 4 and 5 for your bottom lashes.
  7. Take a highlight shadow with a light shimmer and apply it directly to your brow bone which is underneath your eyebrows.
After these 7 steps you are done! This look will make your eyes pop without using a massive amount of products, lots of blending, and too much color.
How do you make your eyes POP? 


Tuesday, May 21, 2013

Hair 101: Decorate Your Braid

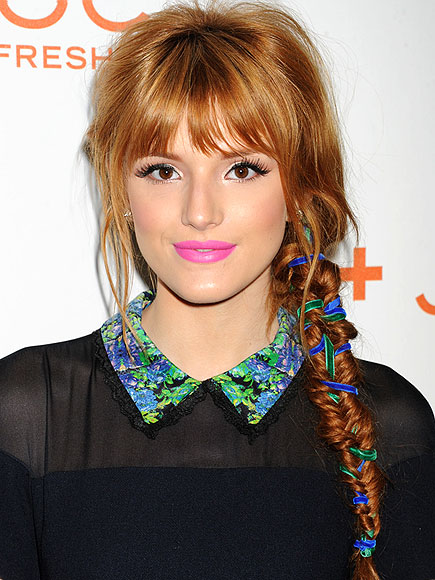
Whether you're rocking a fish tail braid, french braid, or even a loose ponytail it always looks good to add a little flair to your hair. This spring and summer it is all about intertwining ribbons, colorful bobby pins, and fun clips into your hair, especially with braid hairstyles. Below are two of my favorite decorated hair looks both sported by Bella Thorne. The hair accessories add so much personality, playfulness, and fun to her overall beauty look without even trying!

All you need for this look is to find colorful ribbons and strings then hold them in a section with your hair and begin braiding as normal. It looks best when the color is a neon or pretty pastel that pops against your natural hair color or matches with your outfit. The ribbon doesn't even have to match your actual hair length, just long enough to be secured in the elastic band.


This hair look is super easy! All you have to do is add fun hair clips throughout your hairstyle wherever you want. You can even learn how to make your own variety of hair clips to go with any look.
How do you spice up your hair looks?

Sunday, May 12, 2013

Get the Look: Simple Braided Bun

Lauren Conrad 
Warm weather calls for hairstyles that keep your hair out of your face which is why Lauren Conrad's casual braided bun look is perfect! The braid is super cute and gets your hair out of your face while the bun keeps it chic and easy. All you need to recreate the look is bobby pins and a ponytail holder. 
  1. Begin by brushing all the tangles out of your hair and separating sections near the front to begin a braid.
  2. Begin braid your hair in the front going to the back. You can either braid to your head or separately.
  3. Gather the hair to the side or the back of your head and secure it into a ponytail. 
  4. Wrap the hair into a bun and secure with bobby pins.
How do you keep your hair out of your face without losing the "cute" factor?

Tuesday, May 7, 2013

DIY: Dainty Wire Rings

I love dainty rings that wrap around the entire fingers and knuckles and go with just about anything! That's why I decided to take a trip to my local crafts store and pick up the tools I needed to stock up my ring collection. Keep on reading to find out how to make your own dainty wire rings.
Your going to want to start by picking up a pair of wire cutters, a nail polish bottle the same size as your finger, and wire, preferably 20 gauge wire. 
You can start by wrapping the wire in cool designs and using the wire cutter to cut off the excessive amount of wire from around your finger.
You can also begin by "measuring" out the amount of wire you need around the nail polish bottle and cutting it about a centimeter out from where the wire ends touch each other.
My favorite part is actually creating loops and words which is done by using your fingers or the wire cutter's pointy ends and moving the wire until it forms the shape you desire.

What are your favorite DIY projects?


Monday, April 29, 2013

DIY Nails: Bright and Fun Colorblock

I decided to enter the Sally Hansen nail design competition and the theme for this month's nails was colorblock! I decided to make my colorblock original by using three of my favorite colors paired with a strong white to break them up. You can even vote for my nail design on SallyHansen.com and you will see "lyndseycamille" by my design. If you would like to recreate my nail design, all you need is three bright contrasting colors, a white nail striper, and a clear top and base coat.

Tuesday, April 2, 2013

Get the Look: Everyday Glam

Willa Holland 
I am in love with these easy going yet glam makeup ad hair look worn by Willa Holland. Willa's makeup is very minimal with hints of shimmer and gorgeous defined eyes. Her hair gives her the needed quirky youthfulness because of the slightly undone look of the topknot. All you need to recreate the look is black pencil eyeliner and mascara, a shimmery tinted lipgloss, a BB cream, a brown shadow, and a highlight shadow.
  1. Begin with a clean face and apply a BB cream to lightly cover your blemishes as well as protect your skin from the sun.
  2. Prime your eyelids with a primer and apply the highlighter shadow to your brow bone. Be sure to blend.
  3. Apply the brown shadow up to your crease for a sweep of light color. 
  4. Take the eyeliner and line your waterline with black liner. Be gentle! 
  5. Line your upper lash line with a medium line. You can even add a wing if you would like.
  6. Apply 2-3 coats of mascara to your lashes.
  7. Apply a tinted lipgloss to your lips to finish the make-up.
  8. As for the hair, pull your hair up into a ponytail and secure with a ponytail. Then twist your hair into a topknot and secure with bobby pins. 
How do you glam up your everyday look?

Saturday, March 30, 2013

Hair 101: Spring Breaker Style

Spring break is all about relaxation meaning most of us are doing absolutely nothing. Whether you're doing absolutely nothing at the beach or on the couch, cute hairstyles are always a must! I love the look of wavy hair which can be achieved by letting your natural hair do its thing, the ocean water mixing into your hair, or simply using curl enhancing products to bring out your hair texture. Below are my top three favorite"Spring Breaker" hairstyles that even I will be rocking throughout my spring break. Don't forget that even if you don't have wavy or textured hair you can still do these amazing styles.
Vanessa Hudgens 
Vanessa is known for having a boho easygoing style which is definitely seen through her casual wavy bun. If it happens to be warmer wherever you are for spring break it is always good to get to your hair out of your face. All you need to do to achieve this hairstyle is pull all your hair up into a high bun and secure with an elastic and bobby pins. This bun is all about being carefree so it's okay if your bangs fall out and as well as a few pieces of the bun, just use clips to secure the pieces you don't want sticking out. 
Ashley Benson
Wavy hair is a go to if you are spending spring break at the beach because the humidity and water will make your hair's natural texture come out! All you want to make sure is that you keep a frizz serum so your hair will not go completely out of control and a comb to keep it tangle free. If you won't be at the beach getting gorgeous beach waves, you can always braid your hair overnight or you use curl enhancing products along with a scrunching technique to get your own beach waves. 

Jennifer Lawrence 
Last, but not least is a spunky messy ponytail . They the higher the hair, the closer to Heaven which is exactly the vibe Jennifer Lawrence is giving off with her high ponytail. A high ponytail always gives off a look of perkiness and ease, plus they're super easy to create. A messier ponytail is more casual and everyday, but if you add small detail such as tamed bangs and a piece of hair wrapped around the elastic, you will have a more polished and trendy high ponytail.

What do you have planned for spring break? 

Thursday, March 14, 2013

DIY Nails: All About the Houndstooth

 I have fallen in love with the houndstooth print and can't wait to start seeing it everywhere in the spring. Whenever I begin to really start loving a print, I always try it out on my nails so I get to wear the print for at least a week. All I needed to do my houndstooth nails were a nail art brush, white nail polish, and a solid color polish. Keep reading for a step-by-step tutorial on how to create your own houndstooth nail design.

Begin by painting all your nails one solid color. I chose a pink color for a more vibrant and springtime feel.
Use a nail art brush dipped in white nail polish and make tow equally spaced stripes going vertically down your nail. Clean your nail art brush afterwards.
Use your nail art brush again, but dip it into your base color nail polish and create two horizontal stripes down the nails. Clean the nail art brush. Now notice the white squares created by the stripes use the nail art brush dipped in white polish to add one short white line to the top right corner of each square. Now add a short white line to the bottom left corner of the square. Lastly, add two small connecting lines to the top left corner of each square. Wait about 10 minutes or longer for the design to draw then add a clear top coat.
*Use the pictures as guidelines and steps for recreating the nail design and remember, you can always make it your own.*

What is your favorite nail design?